Quantcast
Channel: Figure window – Undocumented Matlab
Viewing all 45 articles
Browse latest View live

Matlab toolstrip – part 4 (control customization)

$
0
0

In a previous post I showed how we can create custom Matlab app toolstrips. Toolstrips can be a bit complex to develop so I’m trying to proceed slowly, with each post in the miniseries building on the previous posts. I encourage you to review the earlier posts in the Toolstrip miniseries before reading this post. In today’s post we continue the discussion of the toolstrip created in the previous post:
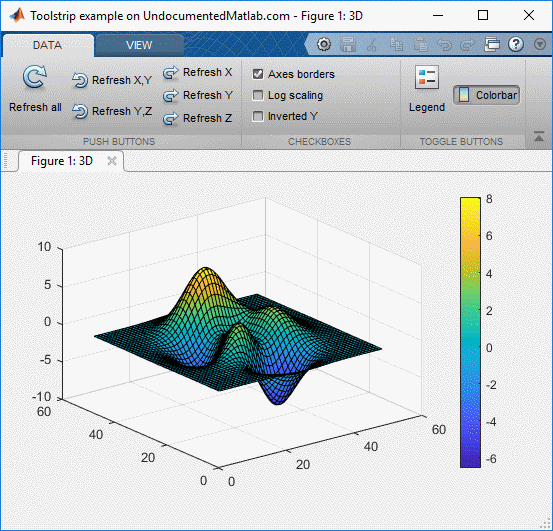
Toolstrip example (basic controls)

Toolstrip example (basic controls)

Today’s post will show how to attach user-defined functionality to toolstrip components, as well as some additional customizations. At the end of today’s article, you should be able to create a fully-functional custom Matlab toolstrip. Today’s post will remain within the confines of a Matlab “app”, i.e. a tool-group that displays docked figures. Future posts will discuss lower-level toolstrip mechanisms, that enable advanced customizations as well as integration in legacy (Java-based, even GUIDE-created) Matlab figures.

Control callbacks

Controls are useless without settable callbacks that affect the program state based on user interactions. There are two different mechanisms for setting callbacks for Matlab toolstrip controls. Refer to the example in the previous post:

  1. Setting the control’s callback property or properties – the property names differ across components (no, for some reason it’s never as simple as Callback in standard uicontrols). For example, the main action callback for push-buttons is ButtonPushedFcn, for toggle-buttons and checkboxes it’s ValueChangedFcn and for listboxes it’s . Setting the callback is relatively easy:
    hColorbar.ValueChangedFcn = @toggleColorbar;
     
    function toggleColorbar(hAction,hEventData)
        if hAction.Selected
            colorbar;
        else
            colorbar('off');
        end
    end

    The hAction object that is passed to the callback function as the first input arg contains various fields of interest, but for some reason the most important object property (Value) is renamed as the Selected property (most confusing). Also, a back-reference to the originating control (hColorbar in this example), which is important for many callbacks, is also missing (and no – I couldn’t find it in the hidden properties either):

    >> hAction
    hAction = 
      Action with properties:
     
                Description: 'Toggle colorbar display'
                    Enabled: 1
                   Shortcut: ''
                   Selected: 1
            QuickAccessIcon: []
        SelectionChangedFcn: @toggleColorbar
                       Text: 'Colorbar'
            IsInQuickAccess: 0
                ButtonGroup: []
                       Icon: [1×1 matlab.ui.internal.toolstrip.Icon]
     
    >> hEventData
    hEventData = 
      ToolstripEventData with properties:
     
        EventData: [1×1 struct]
           Source: [0×0 handle]
        EventName: ''
     
    >> hEventData.EventData
    ans = 
      struct with fields:
     
        Property: 'Value'
        NewValue: 1
        OldValue: 0

    Note that hEventData.Source is an empty handle for some unknown reason.

    The bottom line is that to reference the button state using this callback mechanism we need to either:

    1. Access hAction‘s Selected property which stands-in for the originating control’s Value property (this is what I have shown in the short code snippet above)
    2. Access hEventData.EventData and use its reported Property, NewValue and OldValue fields
    3. Pass the originating control handle as an extra (3rd) input arg to the callback function, and then access it from within the callback. For example:
      hColorbar.ValueChangedFcn = {@toggleColorbar, hColorbar};
       
      function toggleColorbar(hAction,hEventData,hButton)
          if hButton.Value %hAction.Selected
              colorbar;
          else
              colorbar('off');
          end
      end
  2. As an alternative, we can use the addlistener function to attach a callback to control events. Practically all toolstrip components expose public events that can be listened-to using this mechanism. In most cases the control’s callback property name(s) closely follow the corresponding events. For example, for buttons we have the ValueChanged event that corresponds to the ValueChangedFcn property. We can use listeners as follows:
    hCheckbox.addlistener('ValueChanged',@toggleLogY);
     
    function toggleLogY(hCheckbox,hEventData)
        if hCheckbox.Value, type = 'log'; else, type = 'linear'; end
        set(gca, 'XScale',type, 'YScale',type, 'ZScale',type);
    end

    Note that when we use the addlistener mechanism to attach callbacks, we don’t need any of the tricks above – we get the originating control handle as the callback function’s first input arg, and we can access it directly.

    Unfortunately, we cannot pass extra args to the callback that we specify using addlistener (this seems like a trivial and natural thing to have, for MathWorks’ attention…). In other words, addlistener only accepts a function handle as callback, not a cell array. To bypass this limitation in uicontrols, we typically add the extra parameters to the control’s UserData or ApplicationData properties (the latter via the setappdata function). But alas – toolstrip components have neither of these properties, nor can we add them in runtime (as with for other GUI controls). So we need to find some other way to pass these extra values, such as using global variables, or making the callback function nested so that it could access the parent function’s workspace.

Additional component properties

Component text labels, where relevant, can be set using the component’s Text property, and the tooltip can be set via the Description property. As I noted in my previous post, I believe that this is an unfortunate choice of property names. In addition, components have control-specific properties such as Value (checkboxes and toggle buttons). These properties can generally be modified in runtime, in order to reflect the program state. For example, we can disable/enable controls, and modify their label, tooltip and state depending on the control’s new state and the program state in general.

The component icon can be set via the Icon property, where available (for example, buttons have an icon, but checkboxes do not). There are several different ways in which we can set this Icon. I will discuss this in detail in the following post; in the meantime you can review the usage examples in the previous post.

There are a couple of additional hidden component properties that seem promising, most notably Shortcut and Mnemonic (the latter (Mnemonic) is also available in Section and Tab, not just in components). Unfortunately, at least as of R2018b these properties do not seem to be connected yet to any functionality. In the future, I would expect them to correspond to keyboard shortcuts and underlined mnemonic characters, as these functionalities behave in standard menu items.

Accessing the underlying Java control

As long as we’re not displaying the toolstrip on a browser page (i.e., inside a uifigure or Matlab Online), the toolstrip is basically composed of Java Swing components from the com.mathworks.toolstrip.components package (such as TSButton or TSCheckBox). I will discuss these Java classes and their customizations in a later post, but for now I just wish to show how to access the underlying Java component of any Matlab MCOS control. This can be done using a central registry of toolstrip components (so-called “widgets”), which is accessible via the ToolGroup‘s hidden ToolstripSwingService property, and then via each component’s hidden widget Id. For example:

>> widgetRegistry = hToolGroup.ToolstripSwingService.Registry;
>> jButton = widgetRegistry.getWidgetById(hButton.getId)  % get the hButton's underlying Java control
ans =
com.mathworks.toolstrip.components.TSToggleButton[,"Colorbar",layout<>,NORMAL]

We can now apply a wide variety of Java-based customizations to the retrieved jButton, as I have shown in many other articles on this website over the past decade.

Another way to access the toolstrip Java component hierarchy is via hToolGroup.Peer.get(tabIndex).getComponent. This returns the top-level Java control representing the tab whose index in tabIndex (0=left-most tab):

>> jToolGroup = hToolGroup.Peer;  % or: =hToolGroup.ToolstripSwingService.SwingToolGroup;
>> jDataTab = jToolGroup.get(0).getComponent;  % Get tab #0 (first tab: "Data")
>> jDataTab.list   % The following is abridged for brevity
com.mathworks.toolstrip.impl.ToolstripTabContentPanel[tab0069230a-52b0-4973-b025-2171cd96301b,0,0,831x93,...]
 SectionWrapper(section54fb084c-934d-4d31-9468-7e4d66cd85e5)
  com.mathworks.toolstrip.impl.ToolstripSectionComponentWithHeader[,0,0,241x92,...]
   com.mathworks.toolstrip.components.TSPanel[section54fb084c-934d-4d31-9468-7e4d66cd85e5,,layout<HORIZONTAL>,NORMAL]
    TSColumn -> layout<> :
     com.mathworks.toolstrip.components.TSButton[,"Refresh all",layout<>,NORMAL]
    TSColumn -> layout<> :
     com.mathworks.toolstrip.components.TSButton[,"Refresh X,Y",layout<>,NORMAL]
     com.mathworks.toolstrip.components.TSButton[,"Refresh Y,Z",layout<>,NORMAL]
    TSColumn -> layout<> :
     com.mathworks.toolstrip.components.TSButton[,"Refresh X",layout<>,NORMAL]
     com.mathworks.toolstrip.components.TSButton[,"Refresh Y",layout<>,NORMAL]
     com.mathworks.toolstrip.components.TSButton[,"Refresh Z",layout<>,NORMAL]
 SectionWrapper(sectionebd8ab95-fd33-4a3d-8f24-152589713994)
  com.mathworks.toolstrip.impl.ToolstripSectionComponentWithHeader[,0,0,159x92,...]
   com.mathworks.toolstrip.components.TSPanel[sectionebd8ab95-fd33-4a3d-8f24-152589713994,,layout<HORIZONTAL>,NORMAL]
    TSColumn -> layout<> :
     com.mathworks.toolstrip.components.TSCheckBox[,"Axes borders",layout<>,NORMAL]
     com.mathworks.toolstrip.components.TSCheckBox[,"Log scaling",layout<>,NORMAL]
     com.mathworks.toolstrip.components.TSCheckBox[,"Inverted Y",layout<>,NORMAL]
 SectionWrapper(section01995bfd-61de-490f-aa22-de50bae1af75)
  com.mathworks.toolstrip.impl.ToolstripSectionComponentWithHeader[,0,0,125x92,...]
   com.mathworks.toolstrip.components.TSPanel[section01995bfd-61de-490f-aa22-de50bae1af75,,layout<HORIZONTAL>,NORMAL]
    TSColumn -> layout<> :
     com.mathworks.toolstrip.components.TSToggleButton[,"Legend",layout<>,NORMAL]
    TSColumn -> layout<> :
     com.mathworks.toolstrip.components.TSLabel[null," ",layout<>,NORMAL]
     com.mathworks.toolstrip.components.TSToggleButton[,"Colorbar",layout<>,NORMAL]
     com.mathworks.toolstrip.components.TSLabel[null," ",layout<>,NORMAL]
 com.mathworks.mwswing.MJButton[toolstrip.header.collapseButton,808,70,20x20,...]

Toolstrip miniseries roadmap

The next post will discuss icons, for both toolstrip controls as well as the ToolGroup app window.

I plan to discuss complex components in subsequent posts. Such components include button-group, drop-down, listbox, split-button, slider, popup form, gallery etc.

Following that, my plan is to discuss toolstrip collapsibility, the ToolPack framework, docking layout, DataBrowser panel, QAB (Quick Access Bar), underlying Java controls, and adding toolstrips to figures – not necessarily in this order.

Have I already mentioned that Matlab toolstrips can be a bit complex?

If you would like me to assist you in building a custom toolstrip or GUI for your Matlab program, please let me know.

Happy New Year, everyone!


Matlab toolstrip – part 6 (complex controls)

$
0
0

In previous posts I showed how we can create custom Matlab app toolstrips using simple controls such as buttons and checkboxes. Today I will show how we can incorporate more complex controls into our toolstrip: button groups, edit-boxes, spinners, sliders etc.

Some custom Toolstrip Controls

Toolstrips can be a bit complex to develop so I’m proceeding slowly, with each post in the miniseries building on the previous posts. I encourage you to review the earlier posts in the Toolstrip miniseries before reading this post.

The first place to search for potential toostrip components/controls is in Matlab’s built-in toolstrip demos. The showcaseToolGroup demo displays a large selection of generic components grouped by function. These controls’ callbacks do little less than simply output a text message in the Matlab console. On the other hand, the showcaseMPCDesigner demo shows a working demo with controls that interact with some docked figures and their plot axes. The combination of these demos should provide plenty of ideas for your own toolstrip implementation. Their m-file source code is available in the %matlabroot%/toolbox/matlab/toolstrip/+matlab/+ui/+internal/+desktop/ folder. To see the available toolstrip controls in action and how they could be integrated, refer to the source-code of these two demos.

All toolstrip controls are defined by classes in the %matlabroot%/toolbox/matlab/toolstrip/+matlab/+ui/+internal/+toolstrip/ folder and use the matlab.ui.internal.toolstrip package prefix, for example:

% Alternative 1:
hButton = matlab.ui.internal.toolstrip.Button;
 
% Alternative 2:
import matlab.ui.internal.toolstrip.*
hButton = Button;

For the remainder of today’s post it is assumed that you are using one of these two alternatives whenever you access any of the toolstrip classes.

Top-level toolstrip controls

ControlDescriptionImportant propertiesCallbacksEvents
EmptyControlPlaceholder (filler) in container column(none)(none)(none)
LabelSimple text label (no action)Icon, Text (string)(none)(none)
ButtonPush-buttonIcon, Text (string)ButtonPushedFcnButtonPushed
ToggleButtonToggle (on/off) buttonIcon, Text (string), Value (logical true/false), ButtonGroup (a ButtonGroup object)ValueChangedFcnValueChanged
RadioButtonRadio-button (on/off)Text (string), Value (logical true/false), ButtonGroup (a ButtonGroup object)ValueChangedFcnValueChanged
CheckBoxCheck-box (on/off)Text (string), Value (logical true/false)ValueChangedFcnValueChanged
EditFieldSingle-line editboxValue (string)ValueChangedFcnValueChanged, FocusGained, FocusLost
TextAreaMulti-line editboxValue (string)ValueChangedFcnValueChanged, FocusGained, FocusLost
SpinnerA numerical spinner control of values between min,maxLimits ([min,max]), StepSize (integer), NumberFormat (‘integer’ or ‘double’), DecimalFormat (string), Value (numeric)ValueChangedFcnValueChanged, ValueChanging
SliderA horizontal slider of values between min,maxLimits ([min,max]), Labels (cell-array), Ticks (integer), UseSmallFont (logical true/false, R2018b onward), ShowButton (logical true/false, undocumented), Steps (integer, undocumented), Value (numeric)ValueChangedFcnValueChanged, ValueChanging
ListBoxList-box selector with multiple itemsItems (cell-array), SelectedIndex (integer), MultiSelect (logical true/false), Value (cell-array of strings)ValueChangedFcnValueChanged
DropDownSingle-selection drop-down (combo-box) selectorItems (cell-array), SelectedIndex (integer), Editable (logical true/false), Value (string)ValueChangedFcnValueChanged
DropDownButtonButton that has an associated drop-down selectorIcon, Text (string), Popup (a PopupList object)DynamicPopupFcn(none)
SplitButtonSplit button: main clickable part next to a drop-down selectorIcon, Text (string), Popup (a PopupList object)ButtonPushedFcn, DynamicPopupFcnButtonPushed, DropDownPerformed (undocumented)
GalleryA gallery of selectable options, displayed in-panelMinColumnCount (integer), MaxColumnCount (integer), Popup (a GalleryPopup object), TextOverlay (string)(none)(none)
DropDownGalleryButtonA gallery of selectable options, displayed as a drop-downMinColumnCount (integer), MaxColumnCount (integer), Popup (a GalleryPopup object), TextOverlay (string)(none)(none)

In addition to the control properties listed in the table above, all toolstrip controls share some common properties:

  • Description – a string that is shown in a tooltip when you hover the mouse over the control
  • Enabled – a logical value (default: true) that controls whether we can interact with the control. A disabled control is typically grayed-over. Note that the value is a logical true/false, not ‘on’/’off’
  • Tag – a string that can be used to uniquely identify/locate the control via their container’s find(tag) and findAll(tag) methods. Can contain spaces and special symbols – does not need to be a valid Matlab identifier
  • Children – contains a list of sub-component (if any); useful with complex controls
  • Parent – the handle of the container that contains the control
  • Type – the type of control, typically its class-name
  • Mnemonic – an undocumented string property, currently unused (?)
  • Shortcut – an undocumented string property, currently unused (?)

The EmptyControl, Button, ToggleButton and CheckBox controls were discussed in an earlier post of this miniseries. The bottom 6 selection controls (ListBox, DropDown, DropDownButton, SplitButton, Gallery and DropDownGalleryButton) will be discussed in the next post. The rest of the controls are described below.

Button groups

A ButtonGroup binds several CheckBox and ToggleButton components such that only one of them is selected (pressed) at any point in time. For example:

hSection = hTab.addSection('Radio-buttons');
hColumn = hSection.addColumn();
 
% Grouped RadioButton controls
hButtonGroup = ButtonGroup;
hRadio = RadioButton(hButtonGroup, 'Option choice #1');
hRadio.ValueChangedFcn = @ValueChangedCallback;
hColumn.add(hRadio);
 
hRadio = RadioButton(hButtonGroup, 'Option choice #2');
hRadio.ValueChangedFcn = @ValueChangedCallback;
hRadio.Value = true;
hColumn.add(hRadio);

Toolstrip ButtonGroup

Toolstrip ButtonGroup

Note that unlike the uibuttongroup object in “standard” figure GUI, the toolstrip’s ButtonGroup object does not have a SelectionChangedFcn callback property (or corresponding event). Instead, we need to set the ValueChangedFcn callback property (or listen to the ValueChanged event) separately for each individual control. This is really a shame – I think it would make good design sense to have a SelectionChangedFcn callback at the ButtonGroup level, as we do for uibuttongroup (in addition to the individual control callbacks).

Also note that the internal documentation of ButtonGroup has an error – it provides an example usage with RadioButton that has its constructor inputs switched: the correct constructor is RadioButton(hButtonGroup,labelStr). On the other hand, for ToggleButton, the hButtonGroup input is the [optional] 3rd input arg of the constructor: ToggleButton(labelStr,Icon,hButtonGroup). I think that it would make much more sense for the RadioButton constructor to follow the documentation and the style of ToggleButton and make the hButtonGroup input the last (2nd, optional) input arg, rather than the 1st. In other words, it would make more sense for RadioButton(labelStr,hButtonGroup), but unfortunately this is currently not the case.

Label, EditField and TextArea

A Label control is a simple non-clickable text label with an optional Icon, whose text is controlled via the Text property. The label’s alignment is controlled by the containing column’s HorizontalAlignment property.

An EditField is a single-line edit-box. Its string contents can be fetched/updated via the Value property, and when the user updates the edit-box contents the ValueChangedFcn callback is invoked (upon each modification of the string, i.e. every key-click). This is a pretty simple control actually.

The EditField control has a hidden (undocumentented) settable property called PlaceholderText, which presumably aught to display a gray initial prompt within the editbox. However, as far as I could see this property has no effect (perhaps, as the name implies, it is a place-holder for a future functionality…).

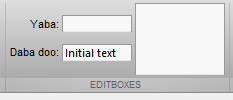
A TextArea is another edit-box control, but enables entering multiple lines of text, unlike EditField which is a single-line edit-box. TextArea too is a very simple control, having a settable Value string property and a ValueChangedFcn callback. Whereas EditField controls, being single-line, would typically be included in 2- or 3-element toolstrip columns, the TextArea would typically be placed in a single-element column, so that it would span the entire column height.

A peculiarity of toolstrip columns is that unless you specify their Width property, the internal controls are displayed with a minimal width (the width is only controllable at the column level, not the control-level). This is especially important with EditField and TextArea controls, which are often empty by default, causing their assigned width to be minimal (only a few pixels). This is corrected by setting their containing column’s Width:

% EditField controls
column1 = hSection.addColumn('HorizontalAlignment','right');
column1.add(Label('Yaba:'))
column1.add(Label('Daba doo:'))
 
column2 = hSection.addColumn('Width',70);
column2.add(EditField);
column2.add(EditField('Initial text'));
 
% TextArea control
column3 = hSection.addColumn('Width',90);
hEdit = TextArea;
hEdit.ValueChangedFcn = @ValueChangedCallback;
column3.add(hEdit);

Toolstrip Label, EditField and TextArea

Toolstrip Label, EditField and TextArea

Spinner

Spinner is a single-line numeric editbox that has an attached side-widget where you can increase/decrease the editbox value by a specified amount, subject to predefined min/max values. If you try to enter an illegal value, Matlab will beep and the editbox will revert to its last acceptable value. You can only specify a NumberFormat of ‘integer’ or ‘double’ (default: ‘integer’) and a DecimalFormat which is a string composed of the number of sub-decimal digits to display and the format (‘e’ or ‘f’). For example, DecimalFormat=’4f’ will display 4 digits after the decimal in floating-point format (‘e’ means engineering format). Here is a short usage example (notice the different ways that we can set the callbacks):

hColumn = hSection.addColumn('Width',100);
 
% Integer spinner (-100 : 10 : 100)
hSpinner = Spinner([-100 100], 0);  % [min,max], initialValue
hSpinner.Description = 'this is a tooltip description';
hSpinner.StepSize = 10;
hSpinner.ValueChangedFcn = @ValueChangedCallback;
hColumn.add(hSpinner);
 
% Floating-point spinner (-10 : 0.0001 : 10)
hSpinner = Spinner([-10 10], pi);  % [min,max], initialValue
hSpinner.NumberFormat = 'double';
hSpinner.DecimalFormat = '4f';
hSpinner.StepSize = 1e-4;
addlistener(hSpinner,'ValueChanged', @ValueChangedCallback);
addlistener(hSpinner,'ValueChanging',@ValueChangingCallback);
hColumn.add(hSpinner);

Toolstrip Spinner

Toolstrip Spinner

A logical extension of the toolstrip spinner implementation would be for non-numeric spinners, as well as custom Value display formatting. Perhaps this will become available at some future Matlab release.

Slider

Slider is a horizontal ruler on which you can move a knob from the left (min Value) to the right (max Value). The ticks and labels are optional and customizable. Here is a simple example showing a plain slider (values between 0-100, initial value 70, ticks every 5, labels every 20, step size 1), followed by a custom slider (notice again the different ways that we can set the callbacks):

hColumn = hSection.addColumn('Width',200);
 
hSlider = Slider([0 100], 70);  % [min,max], initialValue
hSlider.Description = 'this is a tooltip';
tickVals = 0 : 20 : 100;
hSlider.Labels = [compose('%d',tickVals); num2cell(tickVals)]';  % {'0',0; '20',20; ...}
hSlider.Ticks = 21;  % =numel(0:5:100)
hSlider.ValueChangedFcn = @ValueChangedCallback;
hColumn.add(hSlider);
 
hSlider = Slider([0 100], 40);  % [min,max], initialValue
hSlider.Labels = {'Stop' 0; 'Slow' 20; 'Fast' 50; 'Too fast' 75; 'Crash!' 100};
try hSlider.UseSmallFont = true; catch, end  % UseSmallFont was only added in R2018b
hSlider.Ticks = 11;  % =numel(0:10:100)
addlistener(hSlider,'ValueChanged', @ValueChangedCallback);
addlistener(hSlider,'ValueChanging',@ValueChangingCallback);
hColumn.add(hSlider);

Toolstrip Slider

Toolstrip Slider

Toolstrip miniseries roadmap

The next post will discuss complex selection components, including listbox, drop-down, split-button, and gallery.

Following that, I plan to discuss toolstrip collapsibility, the ToolPack framework, docking layout, DataBrowser panel, QAB (Quick Access Bar), underlying Java controls, and adding toolstrips to figures – not necessarily in this order.
Matlab toolstrips can be a bit complex, so I plan to proceed in small steps, each post building on top of its predecessors.

If you would like me to assist you in building a custom toolstrip or GUI for your Matlab program, please let me know.

Matlab toolstrip – part 7 (selection controls)

$
0
0

In previous posts I showed how we can create custom Matlab app toolstrips using controls such as buttons, checkboxes, sliders and spinners. Today I will show how we can incorporate even more complex selection controls into our toolstrip: lists, drop-downs, popups etc.

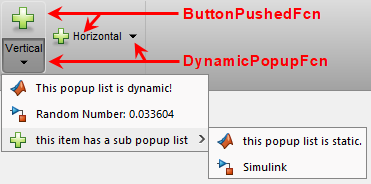
Toolstrip SplitButton with dynamic popup and static sub-menu

Toolstrip SplitButton with dynamic popup and static sub-menu

Toolstrips can be a bit complex to develop so I’m proceeding slowly, with each post in the miniseries building on the previous posts. I encourage you to review the earlier posts in the Toolstrip miniseries before reading this post.

Also, remember to add the following code snippet at the beginning of your code so that the relevant toolstrip classes will be recognized by Matlab:

import matlab.ui.internal.toolstrip.*

There are 4 types of popups in toolstrip controls:

  1. Builtin dropdown (combo-box) selector similar to the familiar uicontrol(‘style’,’popup’,…). In toolstrips, this is implemented using the DropDown control.
  2. A more complex dropdown selector having icons and tooltips, implemented using the DropDownButton and SplitButton toolstrip controls.
  3. An even-more complex drop-down selector, which presents a gallery of options. This will be discussed in detail in the next post.
  4. A fully-customizable form panel (“popup form”). This will be discussed separately, in the following post.

The simple DropDown toolstrip control is very easy to set up and use:

hPopup = DropDown({'Label1';'Label2';'Label3'});
hPopup.Value = 'Label3';
hPopup.ValueChangedFcn = @ValueChangedCallback;

Toolstrip DropDown

Toolstrip DropDown

Note that the drop-down items (labels) need to be specified as a column cell-array (i.e. {a;b;c}) – a row cell-array ({a,b,c}) will result in run-time error.

We can have the control hold a different value for each of the displayed labels, by specifying the input items as an Nx2 cell-array:

items = {'One',   'Label1'; ...
         'Two',   'Label2'; ...
         'Three', 'Label3'}
hPopup = DropDown(items);
hPopup.Value = 'Two';
hPopup.ValueChangedFcn = @ValueChangedCallback;

This drop-down control will display the labels “Label1”, “Label2” (initially selected), and “Label3”. Whenever the selected drop-down item is changed, the corresponding popup Value will change to the corresponding value. For example, when “Label3” is selected in the drop-down, hPopup.Value will change to ‘Three’.

Another useful feature of the toolstrip DropDown control is the Editable property (logical true/false, default=false), which enables the user to modify the entry in the drop-down’s editbox. Any custom text entered within the editbox will update the control’s Value property to that string.

ListBox

We can create a ListBox in a very similarly manner to DropDown. For example, the following code snippet creates a list-box that spans the entire toolstrip column height and has 2 of its items initially selected:

hColumn = hSection.addColumn('Width',100);
allowMultiSelection = true;
items = {'One','Label1'; 'Two','Label2'; 'Three','Label3'; 'Four','Label4'; 'Five','Label5'};
hListBox = ListBox(items, allowMultiSelection);
hListBox.Value = {'One'; 'Three'};
hListBox.ValueChangedFcn = @ValueChangedCallback;
hColumn.add(hListBox);

Toolstrip ListBox (multi-selection)

Toolstrip ListBox (multi-selection)

The DropDown and ListBox controls are nearly identical in terms of their properties, methods and events/callbacks, with the following notable exceptions:

  • ListBox controls do not have an Editable property
  • ListBox controls have a MultiSelect property (logical, default=false), which DropDowns do not have. Note that this property can only be set during the ListBox‘s creation, as shown in the code snippet above.

DropDownButton and SplitButton

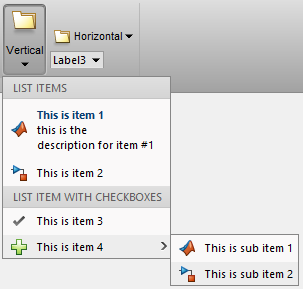
A more elaborate drop-down selector can be created using the DropDownButton and SplitButton toolstrip controls. For such controls, we create a PopupList object, and add elements to it, which could be any of the following, in whichever order that you wish:

  1. PopupListHeader – a section header (title), non-selectable
  2. ListItem – a selectable list item, with optional Icon, Text, and Description (tooltip string, which for some reason [probably a bug] is not actually shown). For some reason (perhaps a bug), the Description is not shown in a tooltip (no tooltip is displayed). However, it is displayed as a label beneath the list-item’s main label, unless we set ShowDescription to false.
  3. ListItemWithCheckBox – a selectable list item that toggles a checkmark icon based on the list item’s selection Value (on/off). The checkmark icon is not customizable (alas).
  4. ListItemWithPopup – a non-selectable list item, that displays a sub-menu (another PopupList that should be set to the parent list-item’s Popup property).

A simple usage example (adapted from the showcaseToolGroup demo):

Toolstrip PopupList

Toolstrip PopupList

function hPopup = createPopup()
 
    import matlab.ui.internal.toolstrip.*
    hPopup = PopupList();
 
    % list header #1
    header = PopupListHeader('List Items');
    hPopup.add(header);
 
    % list item #1
    item = ListItem('This is item 1', Icon.MATLAB_16);
    item.Description = 'this is the description for item #1';
    item.ShowDescription = true;
    item.ItemPushedFcn = @ActionPerformedCallback;
    hPopup.add(item);
 
    % list item #2
    item = ListItem('This is item 2', Icon.SIMULINK_16);
    item.Description = 'this is the description for item #2';
    item.ShowDescription = false;
    addlistener(item, 'ItemPushed', @ActionPerformedCallback);
    hPopup.add(item);
 
    % list header #2
    header = PopupListHeader('List Item with Checkboxes');
    hPopup.add(header);
 
    % list item with checkbox
    item = ListItemWithCheckBox('This is item 3', true);
    item.ValueChangedFcn = @PropertyChangedCallback;
    hPopup.add(item);
 
    % list item with popup
    item = ListItemWithPopup('This is item 4',Icon.ADD_16);
    item.ShowDescription = false;
    hPopup.add(item);
 
    % Sub-popup
    hSubPopup = PopupList();
    item.Popup = hSubPopup;
    % sub list item #1
    sub_item1 = ListItem('This is sub item 1', Icon.MATLAB_16);
    sub_item1.ShowDescription = false;
    sub_item1.ItemPushedFcn = @ActionPerformedCallback;
    hSubPopup.add(sub_item1);
    % sub list item #2
    sub_item2 = ListItem('This is sub item 2', Icon.SIMULINK_16);
    sub_item2.ShowDescription = false;
    sub_item2.ItemPushedFcn = @ActionPerformedCallback;
    hSubPopup.add(sub_item2);
 
end  % createPopup()

We now have two alternatives for attaching this popup to the DropDownButton or SplitButton:

Toolstrip SplitButton with dynamic popup and static sub-menu

Toolstrip SplitButton with dynamic popup and static sub-menu

  • Static popup – set the Popup property of the button or ListItemWithPopup to the popup-creation function (or hPopup). The popup will be created once and will remain unchanged throughout the program execution. For example:
    hButton = DropDownButton('Vertical', Icon.OPEN_24);
    hButton.Popup = createPopup();
  • Dynamic popup – set the DynamicPopupFcn of the button or ListItemWithPopup to the popup creation function. This function will be invoked separately whenever the user clicks on the drop-down selector widget. Inside our popup-creation function we can have state-dependent code that modifies the displayed list items depending on the state of our program/environment. For example:
    hButton = SplitButton('Vertical', Icon.OPEN_24);
    hButton.ButtonPushedFcn = @ActionPerformedCallback;  % invoked when user clicks the main split-button part
    hButton.DynamicPopupFcn = @(h,e) createPopup();      % invoked when user clicks the drop-down selector widget


DropDownButton and SplitButton are exactly the same as far as the popup-list is concerned: If it is set via the Popup property then the popup is static (in the sense that it is only evaluated once, when created), and if it is set via DynamicPopupFcn then the popup is dynamic (re-created before display). The only difference between DropDownButton and SplitButton is that in addition to the drop-down control, a SplitButton also includes a regular push-button control (with its corresponding ButtonPushedFcn callback).

In summary:

  • If DynamicPopupFcn is set to a function handle, then the PopupList that is returned by that function will be re-evaluated and displayed whenever the user clicks the main button of a DropDownButton or the down-arrow part of a SplitButton. This happens even if the Popup property is also set i.e., DynamicPopupFcn has precedence over Popup; when both of them are set, Popup is silently ignored (it would be useful for Matlab to display a warning in such cases, hopefully in a future release).
  • If DynamicPopupFcn is not set but Popup is (to a PopupList object handle), then this PopupList will be computed only once (when first created) and then it will be displayed whenever the user clicks the main button of a DropDownButton or the down-arrow part of a SplitButton.
  • Separately from the above, if a SplitButton‘s ButtonPushedFcn property is set to a function handle, then that function will be evaluated whenever the user clicks the main button of the SplitButton. No popup is presented, unless of course the callback function displays a popup programmatically. Note that ButtonPushedFcn is a property of SplitButton; this property does not exist in a DropDownButton.

Important note: whereas DropDown and ListBox have a ValueChangedFcn callback that is invoked whenever the drop-down/listbox Value has changed, the callback mechanism is very different with DropDownButton and SplitButton: here, each menu item has its own individual callback that is invoked when that item is selected (clicked): ItemPushedFcn for ListItem; ValueChangedFcn for ListItemWithCheckBox; and DynamicPopupFcn for ListItemWithPopup. As we shall see later, the same is true for gallery items – each item has its own separate callback.

Galleries

Toolstrip galleries are panels of buttons (typically large icons with an attached text label), which are grouped in “categories”.

The general idea is to first create the GalleryPopup object, then add to it a few GalleryCategory groups, each consisting of GalleryItem (push-buttons) and/or ToggleGalleryItem (toggle-buttons) objects. Once this GalleryPopup is created, we can either integrate it in-line within the toolstrip section (using Gallery), or as a compact drop-down button (using DropDownGalleryButton):

% Inline gallery
section = hTab.addSection('Multiple Selection Gallery');
column = section.addColumn();
popup = GalleryPopup('ShowSelection',true);
% add the GalleryPopup creation code (see next week's post)
gallery = Gallery(popup, 'MaxColumnCount',4, 'MinColumnCount',2);
column.add(gallery);
 
% Drop-down gallery
section = hTab.addSection('Drop Down Gallery');
column = section.addColumn();
popup = GalleryPopup();
% add the GalleryPopup creation code (see next week's post)
button = DropDownGalleryButton(popup, 'Examples', Icon.MATLAB_24);
button.MinColumnCount = 5;
column.add(button);

Toolstrip Gallery (in-line & drop-down)

I initially planned to include all the relevant Gallery discussion here, but it turned out to require so much space that I decided to devote a separate article for it — this will be the topic of next week’s blog post.

Toolstrip miniseries roadmap

The next post will discuss Galleries in depth, followed by popup forms.

Following that, I plan to discuss toolstrip collapsibility, the ToolPack framework, docking layout, DataBrowser panel, QAB (Quick Access Bar), underlying Java controls, and adding toolstrips to figures – not necessarily in this order.
Matlab toolstrips can be a bit complex, so I plan to proceed in small steps, each post building on top of its predecessors.

If you would like me to assist you in building a custom toolstrip or GUI for your Matlab program, please let me know.

Matlab toolstrip – part 8 (galleries)

$
0
0

In previous posts I showed how we can create custom Matlab app toolstrips using various controls (buttons, checkboxes, drop-downs, lists etc.). Today I will show how we can incorporate gallery panels into our Matlab toolstrip.

Toolstrip Gallery (in-line & drop-down)

Toolstrips can be a bit complex to develop so I’m proceeding slowly, with each post in the miniseries building on the previous posts. I encourage you to review the earlier posts in the Toolstrip miniseries before reading this post.

Also, remember to add the following code snippet at the beginning of your code so that the relevant toolstrip classes will be recognized by Matlab:

import matlab.ui.internal.toolstrip.*

Gallery sub-components

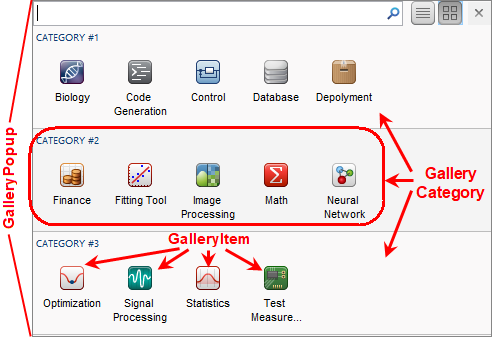
Toolstrip gallery popup components

Toolstrip gallery popup components

Toolstrip galleries are panels of buttons (typically large icons with an attached text label), which are grouped in “categories”. The gallery content can be presented either in-line within the toolstrip (a Gallery control), or as a drop-down button’s popup panel (a DropDownGalleryButton control). In either case, the displayed popup panel is a GalleryPopup object, that is composed of one or more GalleryCategory, each of which has one or more GalleryItem (push-button) and/or ToggleGalleryItem (toggle-button).
  • Gallery or DropDownGalleryButton
    • GalleryPopup
      • GalleryCategory
        • GalleryItem or ToggleGalleryItem
        • GalleryItem or ToggleGalleryItem
      • GalleryCategory

For a demonstration of toolstrip Galleries, see the code files in %matlabroot%/toolbox/matlab/toolstrip/+matlab/+ui/+internal/+desktop/, specifically showcaseToolGroup.m and showcaseBuildTab_Gallery.m.

GalleryPopup

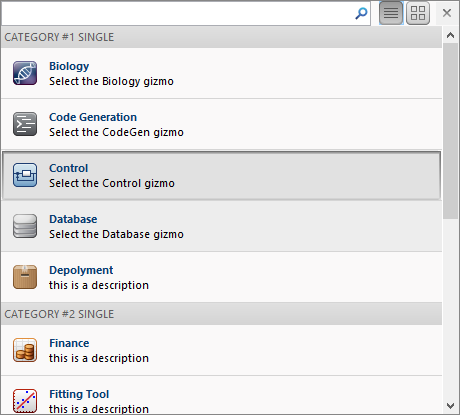
We first create the GalleryPopup object, then add to it a few GalleryCategory groups of GalleryItem, ToggleGalleryItem buttons. In the example below, we use a ButtonGroup to ensure that only a single ToggleGalleryItem button is selected:

import matlab.ui.internal.toolstrip.*
popup = GalleryPopup('ShowSelection',true);
 
% Create gallery categories
cat1 = GalleryCategory('CATEGORY #1 SINGLE'); popup.add(cat1);
cat2 = GalleryCategory('CATEGORY #2 SINGLE'); popup.add(cat2);
cat3 = GalleryCategory('CATEGORY #3 SINGLE'); popup.add(cat3);
 
% Create a button-group to control item selectability
group = matlab.ui.internal.toolstrip.ButtonGroup;
 
% Add items to the gallery categories
fpath = [fullfile(matlabroot,'toolbox','matlab','toolstrip','web','image') filesep];  % icons path
 
item1 = ToggleGalleryItem('Biology', Icon([fpath 'biology_app_24.png']), group);
item1.Description = 'Select the Biology gizmo';
item1.ItemPushedFcn = @(x,y) ItemPushedCallback(x,y);
cat1.add(item1);
 
item2 = ToggleGalleryItem('Code Generation', Icon([fpath 'code_gen_app_24.png']), group);
cat1.add(item2);
 
item3 = ToggleGalleryItem('Control', Icon([fpath 'control_app_24.png']), group);
cat1.add(item3);
 
item4 = ToggleGalleryItem('Database', Icon([fpath 'database_app_24.png']), group);
cat1.add(item4);
...

Single-selection GalleryPopup (icon view)

Single-selection GalleryPopup (icon view)

Note that in a real-world situation, we’d assign a Description, Tag and ItemPushedFcn to all gallery items. This was elided from the code snippet above for readability, but should be part of any actual GUI. The Description only appears as tooltip popup in icon-view (shown above), but appears as a visible label in list-view (see below).

Gallery items selection: push-button action, single-selection toggle, multiple selection toggle

If we use ToggleGalleryItem without a ButtonGroup, multiple gallery items can be selected, rather than just a single selection as shown above:

...
item1 = ToggleGalleryItem('Biology', Icon([fpath 'biology_app_24.png']));item1.Description = 'Select the Biology gizmo';
item1.ItemPushedFcn = @(x,y) ItemPushedCallback(x,y);
cat1.add(item1);
 
item2 = ToggleGalleryItem('Code Generation', Icon([fpath 'code_gen_app_24.png']));cat1.add(item2);
 
item3 = ToggleGalleryItem('Control', Icon([fpath 'control_app_24.png']));cat1.add(item3);
 
item4 = ToggleGalleryItem('Database', Icon([fpath 'database_app_24.png']));cat1.add(item4);
...

Multiple-selection GalleryPopup (icon view)

Multiple-selection GalleryPopup (icon view)

Alternatively, if we use GalleryItem instead of ToggleGalleryItem, the gallery items would be push-buttons rather than toggle-buttons. This enables us to present a gallery of single-action state-less push-buttons, rather than state-full toggle-buttons. The ability to customize the gallery items as either state-less push-buttons or single/multiple toggle-buttons supports a wide range of application use-cases.

Customizing the GalleryPopup

Properties that affect the GalleryPopup appearance are:

  • DisplayState – initial display mode of gallery items (string; default=’icon_view’, valid values: ‘icon_view’,’list_view’)
  • GalleryItemRowCount – number of rows used in the display of the in-line gallery (integer; default=1, valid values: 0,1,2). A Value of 2 should typically be used with a small icon and GalleryItemWidth (see below)
  • GalleryItemTextLineCount – number of rows used for display of the item label (integer; default=2, valid values: 0,1,2)
  • ShowSelection – whether or not to display the last-selected item (logical; default=false). Needs to be true for Gallery and false for DropDownGalleryButton.
  • GalleryItemWidth – number of pixels to allocate for each gallery item (integer, hidden; default=80)
  • FavoritesEnabled – whether or not to enable a “Favorites” category (logical, hidden; default=false)

All of these properties are defined as private in the GalleryPopup class, and can only be specified during the class object’s construction. For example, instead of the default icon-view, we can display the gallery items as a list, by setting the GalleryPopup‘s DisplayState property to 'list_view' during construction:

popup = GalleryPopup('DisplayState','list_view');

GalleryPopup (list view)

GalleryPopup (list view)


Switching from icon-view to list-view and back can also be done by clicking the corresponding icon near the popup’s top-right corner (next to the interactive search-box).

Now that we have prepared GalleryPopup, let’s integrate it in our toolstrip.
We have two choices — either in-line within the toolstrip section (using Gallery), or as a compact drop-down button (using DropDownGalleryButton):

% Inline gallery
section = hTab.addSection('Multiple Selection Gallery');
column = section.addColumn();
popup = GalleryPopup('ShowSelection',true);
% add the GalleryPopup creation code above
gallery = Gallery(popup, 'MinColumnCount',2, 'MaxColumnCount',4);
column.add(gallery);
 
% Drop-down gallery
section = hTab.addSection('Drop Down Gallery');
column = section.addColumn();
popup = GalleryPopup();
% add the GalleryPopup creation code above
button = DropDownGalleryButton(popup, 'Examples', Icon.MATLAB_24);
button.MinColumnCount = 5;
column.add(button);

Toolstrip Gallery (in-line & drop-down)

Clicking any of the drop-down (arrow) widgets will display the associated GalleryPopup.

The Gallery and DropDownGalleryButton objects have several useful settable properties:

  • Popup – a GalleryPopup object handle, which is displayed when the user clicks the drop-down (arrow) widget. Only settable in the constructor, not after object creation.
  • MinColumnCount – minimum number of item columns to display (integer; default=1). In Gallery, this property is only settable in the constructor, not after object creation; if not enough width is available to display these columns, the control collapses into a drop-down. In DropDownGalleryButton, this property can be set even after object creation (despite incorrect internal documentation), and controls the width of the popup panel.
  • MaxColumnCount – maximal number of items columns to display (integer; default=10). In Gallery, this property is only settable in the constructor, not after object creation. In DropDownGalleryButton, this property can be set even after object creation but in any case seems to have no visible effect.
  • Description – tooltip text displayed when the mouse hovers over the Gallery area (outside the area of the internal gallery items, which have their own individual Descriptions), or over the DropDownGalleryButton control.
  • TextOverlay – a semi-transparent text label overlaid on top of the gallery panel (string, default=”). Only available in Gallery, not DropDownGalleryButton.

For example:

gallery = Gallery(popup, 'MinColumnCount',2, 'MaxColumnCount',4);
gallery.TextOverlay = 'Select from these items';

Effect of TextOverlay

Effect of TextOverlay

Toolstrip miniseries roadmap

The next post will discuss popup forms. These are similar in concept to galleries, in the sense that when we click the drop-down widget a custom popup panel is displayed. In the case of a popup form, this is a fully-customizable Matlab GUI figure.

Following that, I plan to discuss toolstrip collapsibility, the Toolpack framework, docking layout, DataBrowser panel, QAB (Quick Access Bar), underlying Java controls, and adding toolstrips to figures – not necessarily in this order.
Matlab toolstrips can be a bit complex, so I plan to proceed in small steps, each post building on top of its predecessors.

If you would like me to assist you in building a custom toolstrip or GUI for your Matlab program, please let me know.

Matlab toolstrip – part 9 (popup figures)

$
0
0

In previous posts I showed how we can create custom Matlab app toolstrips using various controls. Today I will show how we can incorporate popup forms composed of Matlab figures into our Matlab toolstrip. These are similar in concept to drop-down and gallery selectors, in the sense that when we click the toolstrip button a custom popup is displayed. In the case of a popup form, this is a fully-customizable Matlab GUI figure.

Popup figure in Matlab toolstrip

Toolstrips can be a bit complex to develop so I’m proceeding slowly, with each post in the miniseries building on the previous posts. I encourage you to review the earlier posts in the Toolstrip miniseries before reading this post.

Also, remember to add the following code snippet at the beginning of your code so that the relevant toolstrip classes will be recognized by Matlab:

import matlab.ui.internal.toolstrip.*

Main steps and usage example

To attach a figure popup to a toolstrip control, follow these steps:

  1. Create a new figure, using GUIDE or the figure function. The figure should typically be created modal and non-visible, unless there’s a good reason to avoid this. Note that the figure needs to be a legacy (Java-based) figure, created with GUIDE or the figure function — web-based uifigure (created with AppDesigner or the uifigure function) is not [currently] supported.
  2. Create a callback function that opens and initializes this figure, and then moves it to the expected screen location using the following syntax: hToolGroup.showFigureDialog(hFig,hAnchor), where hFig is the figure’s handle, and hAnchor is the handle for the triggering toolstrip control.
  3. Attach the callback function to the triggering toolstrip control.

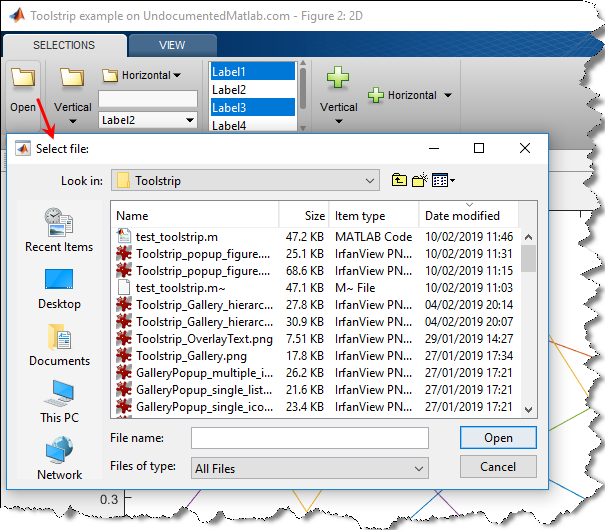
Here’s a simple usage example, in which I present a file-selector popup:

% Create a toolstrip section, column & push-button
hSection = hTab.addSection('Popup');
hColumn = hSection.addColumn();
hButton = Button('Open',Icon.OPEN_24);
hButton.ButtonPushedFcn = {@popupFigure,hButton};  % attach popup callback to the button
hColumn.add(hButton);
 
% Callback function invoked when the toolstrip button is clicked
function popupFigure(hAction, hEventData, hButton)
    % Create a new non-visible modal figure
    hFig = figure('MenuBar','none', 'ToolBar','none', 'WindowStyle','modal', ...
                  'Visible','off', 'NumberTitle','off', 'Name','Select file:');
 
    % Add interactive control(s) to the figure (in this case, a file chooser initialized to current folder)
    jFileChooser = handle(javaObjectEDT(javax.swing.JFileChooser(pwd)), 'CallbackProperties');
    [jhFileChooser, hComponent] = javacomponent(jFileChooser, [0,0,200,200], hFig);
    set(hComponent, 'Units','normalized', 'Position',[0,0,1,1]);  % resize component within containing figure
 
    % Set popup control's callback (in this case, display the selected file and close the popup)
    jhFileChooser.ActionPerformedCallback = @popupActionPerformedCallback;
    function popupActionPerformedCallback(jFileChooser, jEventData)
        fprintf('Selected file: %s\n', char(jFileChooser.getSelectedFile));
        delete(hFig);
    end
 
    % Display the popup figure onscreen, just beneath the triggering button
    hToolGroup.showFigureDialog(hFig,hButton);
 
    % Wait for the modal popup figure to close before resuming GUI interactivity
    waitfor(hFig);
end

This leads to the popup figure as shown in the screenshot above.

The popup figure initially appears directly beneath the triggering button. The figure can then be moved away from that position, by dragging its title bar or border frame.

Note how the popup is an independent heavy-weight figure window, having a border frame, title bar and a separate task-bar icon. Removing the border frame and title-bar of Matlab figures can be done using an undocumented visual illusion – this can make the popup less obtrusive, but also prevent its moving/resizing. An entirely different and probably better approach is to present a light-weight popup panel using the Toolpack framework, which I plan to discuss in the following post(s). The PopupPanel container that I discussed in another post cannot be used, because it is displayed as a sub-component of a Matlab figure, and in this case the popup is not attached to any figure (the toolstrip and ToolGroup are not Matlab figures, as explained here).

The astute reader may wonder why I bothered going to all the trouble of displaying a modal popup with a JFileChooser, when I could have simply used the built-in uigetfile or uiputfile functions in the button’s callback. The answer is that (a) this mechanism displays the popup directly beneath the triggering button using hToolGroup.showFigureDialog(), and also (b) enables complex popups (dialogs) that have no direct builtin Matlab function (for example, a file-selector with preview, or a multi-component input form).

Under the hood of showFigureDialog()

How does showFigureDialog() know where to place the figure, directly beneath the triggering toolstrip anchor?

The answer is really quite simple, if you look at this method’s source-code in %matlabroot%/toolbox/matlab/toolstrip/+matlab/+ui/+internal/+desktop/ToolGroup.m (around line 500, depending on the Matlab release).

The function first checks whether the input hFig handle belongs to a figure or uifigure, and issues an error message in case it’s a uifigures (only legacy figures are currently supported).
Then the function fetches the toolstrip control’s underlying Java control handle using the following code (slightly modified for clarity), as explained here:

jAnchor = hToolGroup.ToolstripSwingService.Registry.getWidgetById(hAnchor.getId());

Next, it uses the Java control’s getLocationOnScreen() to get the control’s onscreen position, accounting for monitor DPI variation that affects the X location.
The figure’s OuterPosition property is then set so that the figure’s top-left corner is exactly next to the control’s bottom-left corner.
Finally, the figure’s Visible property is set to ‘on’ to make the figure visible in its new position.

The popup figure’s location is recomputed by showFigureDialog() whenever the toolstrip control is clicked, so the popup figure is presented in the expected position even when you move or resize the tool-group window.

Toolstrip miniseries roadmap

The following post(s) will present the Toolpack framework. Non-figure (lightweight) popup toolpack panels can be created, which appear more polished/stylish than the popup figures that I presented today. The drawdown is that toolpack panels may be somewhat more complex to program than figures, and IMHO are more likely to change across Matlab releases. In addition to the benefit of popup toolpack panels, toolpack presents an alternative way for toolstrip creation and customization, enabling programmers to choose between using the toolstrip framework (that I discussed so far), and the new toolpack framework.

In a succeeding post, I’ll discuss toolstrip collapsibility, i.e. what happens when the user resizes the window, reducing the toolstrip width. Certain toolstrip controls will drop their labels, and toolstrip sections shrink into a drop-down. The priority of control/section collapsibility can be controlled, so that less-important controls will collapse before more-important ones.

In future posts, I plan to discuss docking layout, DataBrowser panel, QAB (Quick Access Bar), underlying Java controls, and adding toolstrips to figures – not necessarily in this order.
Matlab toolstrips can be a bit complex, so I plan to proceed in small steps, each post building on top of its predecessors.

If you would like me to assist you in building a custom toolstrip or GUI for your Matlab program, please let me know.

Viewing all 45 articles
Browse latest View live